

Caching can significantly increase the performance of your WordPress web site by improving it's loading time and reducing the generated CPU usage.
As a dynamic content management system (CMS), for every visitor's request it has to process, WordPress has to connect to it's database, check if the requested page exists, then output it's content.
That might not be an issue for web sites that does not receive a lot of traffic, however a sudden spike caused by search engine spiders or just increase in the usual visitors, can quickly cause your WordPress web site to generate high CPU usage on the server, while trying to process needless duplicate requests over and over again.
Caching also makes sites much faster, as each page load doesn't have to do all of the heavy lifting usually required to generate the page - so is vital in ensuring your website is as fast as possible.
What most of the caching plugins do, is to cache the first visitor's request and convert it into plain HTML file on the server, so when another visitor requests the same page, they will be served the HTML page, as long as the page has not been updated, or the web site's cache - cleared.
The two WordPress caching plugins we will be reviewing are:
1 - W3 Total Cache:
Difficulty Level:
Features:
2 - WP Fastest Cache:
Difficulty Level:
Features:
Let's start with:
1 - W3 Total Cache
W3 Total Cache is not the most user friendly plugin, however it has packed a lot of features, such as browser caching, page caching, object caching, database caching, minify and content delivery network (CDN) support.
Installing and activating:
Login to your WordPress Dashboard Plugins Add New Search Plugins W3 Total Cache Install Now Activate Plugin. (Click here for detailed instructions)
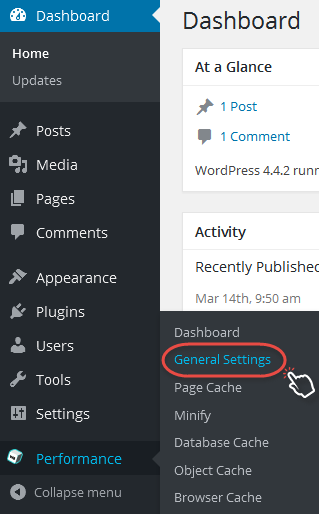
Once installed, go to the Dashboard Performance General Settings:
Depending on the web hosting plan you are using (shared hosting or own Cloud / Dedicated Server), you will have different cache methods available, based on the software installed on the server.
You can tick and Toggle all caching types on or off (at once) but it is recommended to do that manually and enable only caching types you would want to use.
If you are using shared or semi-dedicated web hosting plan, tick and enable:
Page cache caches the visitor's requests and converts them into plain HTML files on the server).
Caching pages will reduce the response time of your web site and increase the scale of your web server.
Page cache: v Enable
Page cache method: Disk: Enhanced
Minify removes white spaces from HTML, CSS and JavaScript files and can decrease their size by ~10% on average.
Minify: v Enable
Minify Mode: Auto
Minify cache method: Disk
HTML minifier: Default
JS minifier: Default
CSS minifier: Default
Database Cache caches database queries and objects. That decreases the response time of your web site. Best used if object caching is not possible.
Database Cache: v Enable
Database Cache Method: Disk
Object Cache reduces execution time for common operations. It greatly increases performance for highly dynamic sites that use the Object Cache API.
Object Cache: v Enable
Object Cache Method: Disk
Browser Cache reduces the server load and decreases the response time by using the cache available in visitor's web browser.
Browser Cache: v Enable
CDN allows you to host the static files with a content delivery network (CDN) provider in order to reduce the page load time.
CDN subscription is required.
If you are a Kualo customer already, you can benefit from our partnership with CloudFlare.
You can enable CloudFlare to your Kualo web hosting account in a few clicks, and it won’t cost you a penny.
Also, as a CloudFlare Optimized Partner, we are able to offer the CloudFlare Railgun™ technology to all our customers absolutely free of charge. Click here for more information: Even Faster Websites with Railgun™!
To enable the W3 Total Cache CloudFlare extension, go to Dashboard Performance Extensions CloudFlare Activate. (Click here for detailed instructions)
Note: You would need to have the CloudFlare already enabled for the WordPress web site.
You can do that from within the cPanel web hosting control panel CloudFlare click on the grey cloud next to the domain name:

If CloudFlare is enabled already, then it is time to return to the WordPress Dashboard and configure the extension.
Click on Performance General Settings CloudFlare, tick to Enable and fill in your details:
CloudFlare account email: The E-Mail account you have used for registering your CloudFlare account.
API key: Obtain your API Key by clicking here and then browsing down to the API Key section:

Domain: Fill in the WordPress web site's domain name.
Security level: Medium
Adjust your website's Security Level to determine which visitors will receive a challenge page.
Essentially off: Challenges only the most grievous offenders
Low: Challenges only the most threatening visitors
Medium (Recommended): Challenges both moderate threat visitors and the most threatening visitors
High: Challenges all visitors that have exhibited threatening behaviour within the last 14 days
I'm Under Attack!: Should only be used if your website is under a DDoS attack
Visitors will receive an interstitial page while we analyse their traffic and behaviour to make sure they are a legitimate human visitor trying to access your website
Note: I'm Under Attack! may affect some actions on your domain. For example, it may block access to your API. You can set a custom security level for any part of your domain using Page Rules.
Rocket Loader: Automatic Mode
Rocket Loader is a general-purpose asynchronous JavaScript loader coupled with a lightweight virtual browser which can safely run any JavaScript code after window.onload.
Turning on Rocket Loader will immediately improve a web page's window.onload time (assuming there is JavaScript on the page), which can have a positive impact on your Google search ranking.
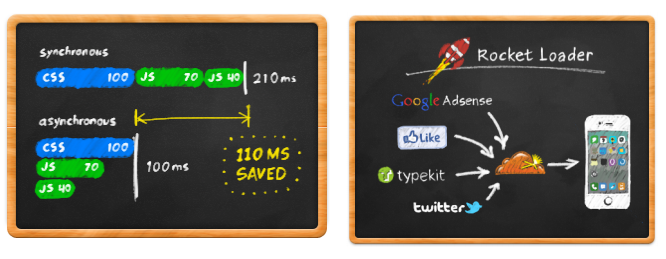
Automatic Mode: Rocket Loader will automatically run on the JavaScript resources on your site, with no configuration required after turning on automatic mode.
Manual Mode: In order to have Rocket Loader execute for a particular script, you must add the following attribute to the script tag: "data-cfasync='true'". As your page passes through CloudFlare, we'll enable Rocket Loader for that particular script. All other JavaScript will continue to execute without CloudFlare touching the script.
Minification: CSS, JavaScript and HTML.
Choose assets to minify (eliminate the white spaces).
Development mode: Off
Turn this option On when you are making changes to static files (Images, CSS, JavaScript and etc.) on your web site that you want to appear immediately. Make sure to turn Off when you are done.
Click on Save all settings once the desired caching types have been configured.
Refer to the Install section of the plugin for information regarding the software installation for Cloud and Dedicated Servers.
Click here if you are looking for a fully managed Cloud or Dedicated Server, so you could take advantage of different caching methods and sky-rocket your WordPress web site.
2 - WP Fastest Cache
WP Fastest Cache is one of the simplest yet powerful caching plugins out there.
It allows you to preload all posts and pages and serve them as static HTML files to your visitors.
The plugin can also minify the HTML and CSS as well as combine the CSS and JavaScript to reduce the HTTP requests.
Installing and activating:
Login to your WordPress Dashboard Plugins Add New Search Plugins WP Fastest Cache Install Now Activate Plugin. (Click here for detailed instructions)
Once activated, click on WP Fastest Cache within your Dashboard:
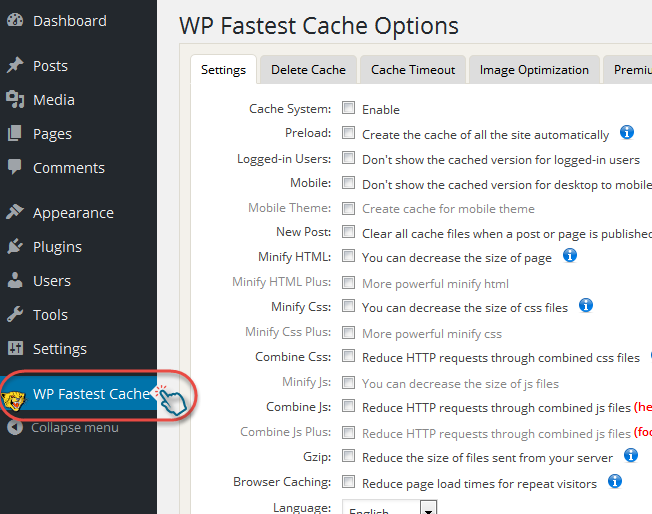
Enabling the caching and speeding your web site is few clicks away!
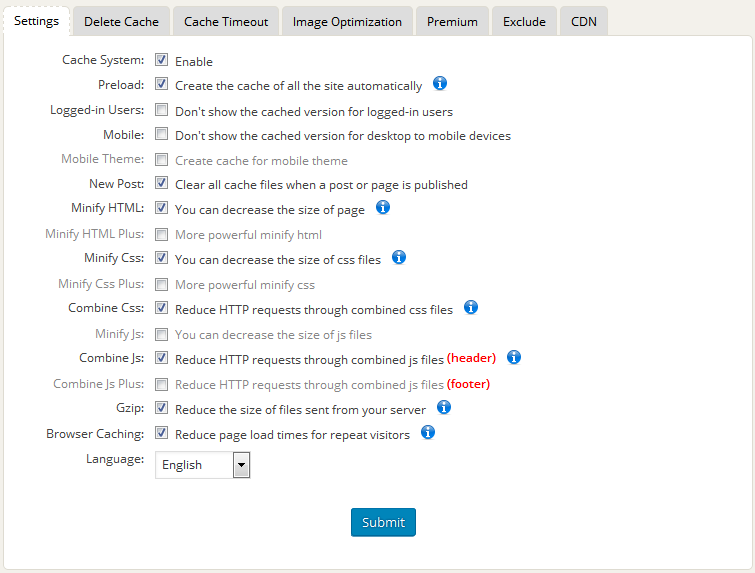
Click and enable:
Cache System: Enables or disables the plugin.
Preload: Select the posts and pages you would like to preload (create the cache).
New Post: Clear all cache files when a post or page is published.
Minify HTML: Decrease all HTML files size by removing the white spaces.
Minify Css: Decrease all CSS files size by removing the white spaces.
Combine Css: Reduce HTTP requests through combined css files.
Combine Js: Reduce HTTP requests through combined css files.
Gzip: Reduce the size of files sent from your server.
Browser Caching: Reduce the load times of pages by storing commonly used files from your website on your visitors browser.
With the latest WP Fastest Cache plugin, you can implement CDN as well. More information is available here.
Important: If you are using eCommerce plugin, such as WooCommerce, it is important to exclude any shop related pages - Cart, My Account, Checkout, Wish list from caching.
That's how to install, configure and use caching plugin to significantly improve WordPress's performance.
You can check our other WordPress related articles here.
Still looking for a good web hosting provider? Check our WordPress optimised web hosting plans.